Animation
Selecting the ![]() will show the animation panel. Here you can create and manage the frames of your animation.
will show the animation panel. Here you can create and manage the frames of your animation.
Transport controls
In the centre, you’ll see controls for playing, pausing, and jumping between frames.
![]() starts playing the animation.
starts playing the animation.
![]() will stop the animation, returning to the frame selected when the animation playback started.
will stop the animation, returning to the frame selected when the animation playback started.
![]() and
and ![]() will move to the previous or next keyframe.
will move to the previous or next keyframe.
![]() and
and ![]() jump to the first or last frame of the animation.
jump to the first or last frame of the animation.
You can also scrub through the timeline by dragging the timeline from left to right. The central frame will be selected, as indicated by the yellow border.

Artwork by Genuine Human Art.
Create frames
All new projects contain one frame of animation. To create new frames, tap on the ![]() button on the animation panel. You can also quickly duplicate the current frame using the
button on the animation panel. You can also quickly duplicate the current frame using the ![]() button.
button.
Frame types
There are two types of frames that can be shown in the animation timeline:
Keyframes: When animating, a keyframe is created for each distinct frame of animation.
Held frames: When you adjust a keyframe’s duration to be greater than x1, a held frame will be added to the timeline for each frame that the animation stays on the keyframe. Held frames are shown in the timeline to give an accurate mapping of the duration of a frame to the space that it takes up on the timeline, which is especially important when scrubbing.
Reorder
To move a frame’s position in the timeline, press and hold the frame you’d like to move, and drag it to where you’d like it to be.
If you drag a keyframe, all of its held frames will be moved at the same time. If you begin dragging from a held frame, the parent keyframe and all associated held frames will be moved.
Keyframe actions
You can perform actions on a keyframe through the frame menu. Tap on the currently selected frame in the timeline to open the menu for that frame.
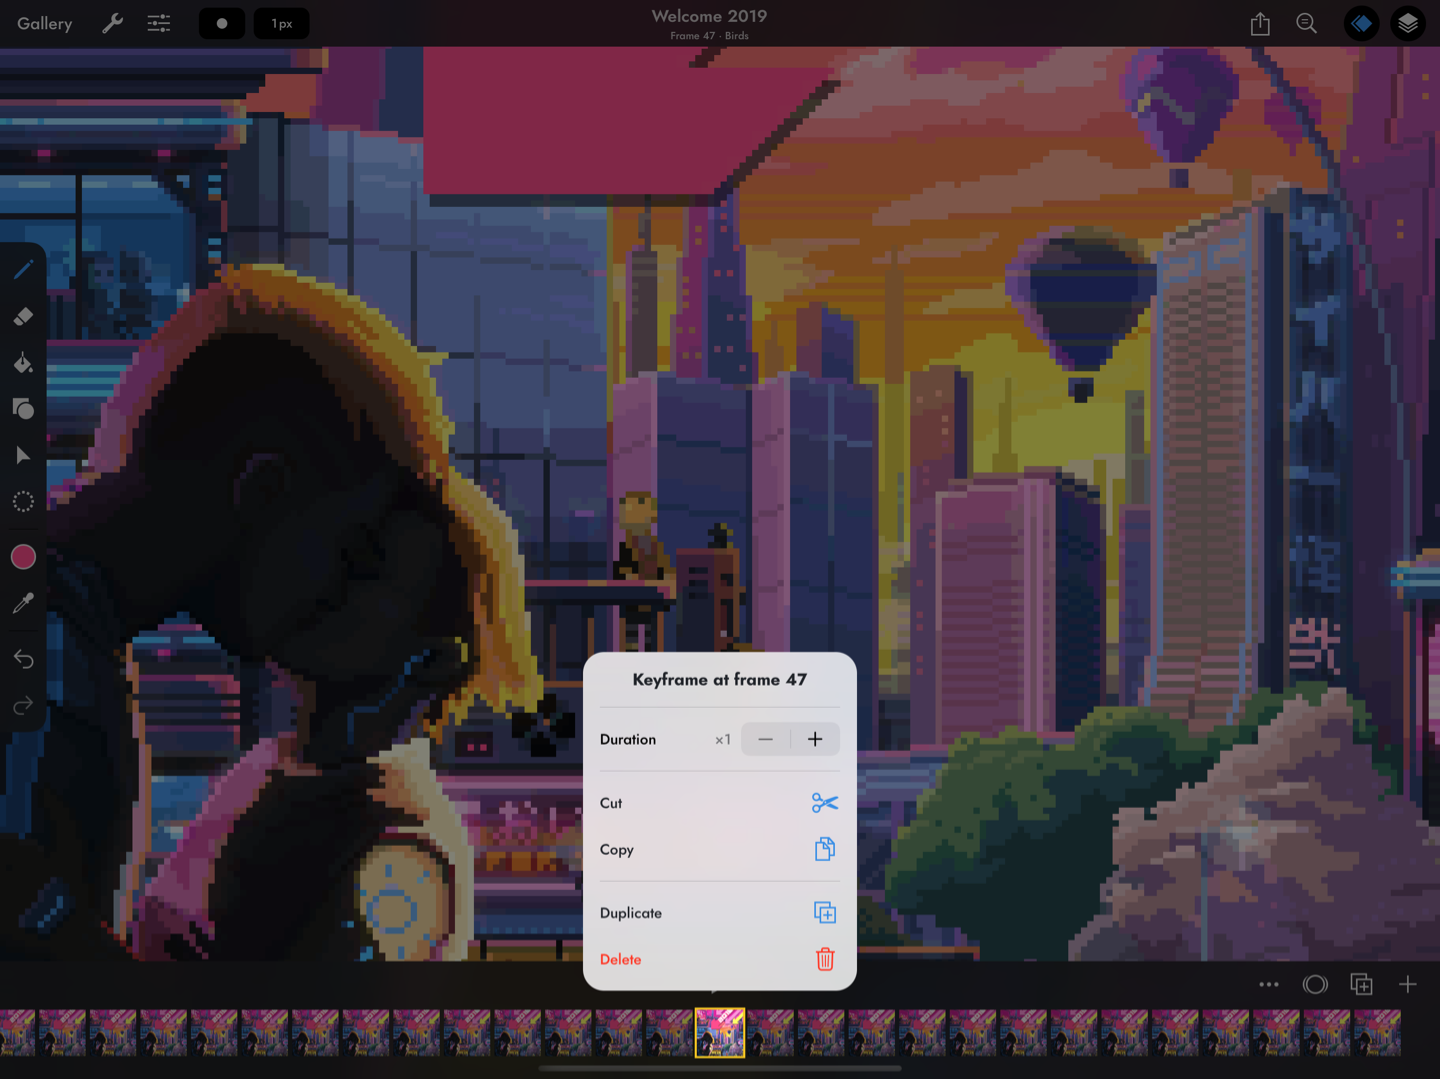
Artwork by Genuine Human Art.
Change duration
The overall speed of animation can be changed in the adjustments menu, but you can also adjust the duration of individual frames. If you increase the duration to x2 for example, it will be displayed for twice as long as the other frames in the animation. So if your animation speed is set to 10fps, a frame with a duration of x1 will be shown for 0.1s, and a frame with a duration of x3 will be shown for 0.3s.
Changing the duration of a frame will add held frames to the timeline.
Cut, copy, paste
To cut or copy a frame, select the ‘Cut’ or ‘Copy’ option from the frame menu.
Frames can be pasted in the same project, but copying and pasting frames between projects is not currently supported.
Frames can be pasted into other apps (or Pixaki) as a flat image.
Duplicate
To duplicate a frame, select ‘Duplicate’ from the frame menu. This will create an exact copy of the selected frame.
Delete
To delete a keyframe, select ‘Delete’ from the keyframe menu.
Held frame actions
As with keyframes, you can perform actions on a held frame through the frame menu. Tap on the currently selected frame in the timeline to open the menu for that frame.
Insert a keyframe
To create a new keyframe where there is currently a held frame, select ‘Insert keyframe’ from the frame menu, or use the ![]() button on the animation panel. This will create an empty keyframe with its duration set to match the remaining duration of the existing parent keyframe’s duration. This means that the overall duration of the animation won’t be affected.
button on the animation panel. This will create an empty keyframe with its duration set to match the remaining duration of the existing parent keyframe’s duration. This means that the overall duration of the animation won’t be affected.
Convert to a keyframe
To convert a held frame to a keyframe, select ‘Convert to keyframe’ from the frame menu or use the ![]() button on the animation panel. This behaves in the same way as inserting a keyframe, except that instead of creating an empty keyframe, the cels from the held frame’s parent keyframe are copied to the new keyframe.
button on the animation panel. This behaves in the same way as inserting a keyframe, except that instead of creating an empty keyframe, the cels from the held frame’s parent keyframe are copied to the new keyframe.
When creating an animation, you may find it useful to rough out the key poses first and set the duration of those keyframes in order to establish the correct timing. You can then insert new keyframes to add in-betweens to smooth out the animation.
Bulk actions
To enter frame selection mode, tap on the ![]() button in the animation panel, and choose ‘Select keyframes’. In selection mode, tapping on a keyframe will add it to the selection, or remove it if it is already in the selection. Select the ‘Actions’ button in the top left to perform actions on multiple keyframes at once.
button in the animation panel, and choose ‘Select keyframes’. In selection mode, tapping on a keyframe will add it to the selection, or remove it if it is already in the selection. Select the ‘Actions’ button in the top left to perform actions on multiple keyframes at once.
Only keyframes can be selected for bulk actions, not held frames.
Onion skinning
Onion skinning is a technique used in animation to show the previous and next frames at the same time as the current frame so that you can make decisions about how to edit the image in the context of the animation. Pixaki has comprehensive support for onion skinning with many configuration options (see Adjustments Menu). To toggle onion skinning, select the ![]() button from the animation toolbar. The button will turn yellow to indicate that onion skinning is active.
button from the animation toolbar. The button will turn yellow to indicate that onion skinning is active.